Digital Sketchnoting of a Live Discussion – A Look into my Process
In early March 2020, I worked with the friendly people who organise an event called Governance Lab here in Berlin – a series of public discussions about different topics exploring new forms of governance and participation in the current day and age.
It was already the second time that I supported the event through creating a live visual recording on my iPad that was projected onto a large screen in the room for everybody to see during the discussion. The topic this time was ‘Freedom of Speech in the Digital Realm”.
The final re-structured digital sketchnote (click on the images for a bigger view)
The format of the event is to kick off with two short 15-minute presentations by two different speakers introducing some key issues and questions from their point of view to give some common starting points for the following discussion. Then the audience has about 90 minutes to discuss the topic. There are no video or audio recordings made, so everybody can speak freely.
The digital sketchnoting I contributed visualised how the discussion unfolded in real time and helped the audience to keep track of the points that have been made before This makes it easier to add to previous strands of thoughts and also shows the audience that their contribution was heard as it appears on the recording.
The medium of sketchnotes (or graphic recording / digital scribing which are similar live visual recording techniques) is also ideal to keep a record of the ideas and questions discussed without them being tied to a particular person. The content is captured, but the contributor stays anonymous and the focus can be fully on WHAT was said, rather than WHO said it.
Let me share a bit of my process
Before the event
I received the key points of the introductory presentations a few hours before the event, so I could prepare the canvas I would capture the discussion a bit in advance. I visualised the six key statements from the presentations together with the title of the discussion in the middle of my canvas. During the discussion, they would serve as visual starting points for the moderators and the audience to explore different areas of the topic.

The six key points from the presentations that I prepared before the discussion as a visual starting point
I also added a light dot grid to the background of my canvas that helps me to keep my writing and sketches in proportion even when I have to zoom in and out of the relatively big canvas while I work.
During the event
When the discussion began after the presentation, I went into live recording mode. My iPad screen was projected onto the large screen in the room for everybody to see.
I used the Procreate app for my recording, which has presentation mode that shows the audience a steady view of the whole canvas while I can work on my device, zooming in and out, using tools and moving the canvas around without distracting the viewers.
Above: Timelapse video of me recording the discussion live
When I sketch a live discussion, my approach to sketchnoting is a bit different than when I sketch a talk or presentation. In a discussion, it is important to me to capture at least one key point or question from any person who contributes to the discussion. I filter less and capture more so that people in the room feel their voice is heard and can see how their contribution adds to the visual record of the discussion. This more detailed capturing means I have to be very quick, both with the writing and the drawing. My drawings are therefore pretty simple and mostly serve as a rough visual anchor for finding a certain topic on the canvas more quickly when scanning it at a glance.
I also don’t have the time to draw a visual for every point that is made, but try to have at least one visual for each conceptual cluster of contributions.
Having to be quick also means I don’t have much time to come up with an idea for WHAT to draw. Usually I draw the first image that comes to my mind. I often find it easiest to think of a situation that relates to the point that was made and draw a little scene involving people acting in this situation. Drawing people is also a great way of making abstract concepts more graspable because you translate them into a concrete situation that the viewer can relate with.
The sketchnote as it looked like immediately after the discussion ended (click on the images for a bigger view)
Even though the work is quick and rough around the edges, the audience really enjoyed the visual support during the discussion. Even the few little images on the canvas brought the contributions of the group to life and seeing the whole canvas filled at the end gave everybody in the room a visual sense of what they achieved together in the last 90 minutes.
After the event
After the event, I took some time to re-order the points, create a stronger visual structure, add some images and do a little overall cleanup of the piece.
While the live version of the recording served its purpose very well DURING the discussion – capturing the contributions, visualising the unfolding of the topic over time, making people feel heard and creating a collective memory of what was said – it wasn’t in the ideal shape (yet) to serve the other purpose we wanted to get out of it: to document the event for a longer period of time and to share the content with a wider group of people who weren’t necessarily in the room at the time.
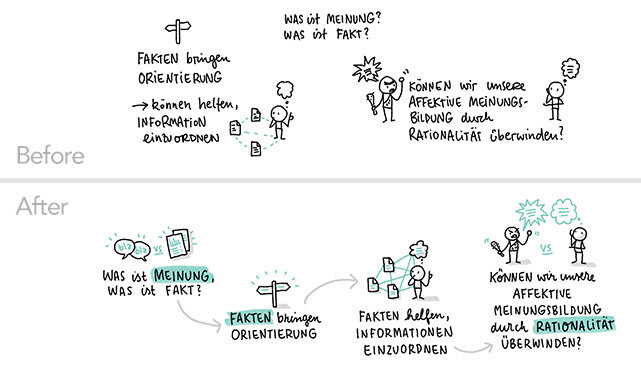
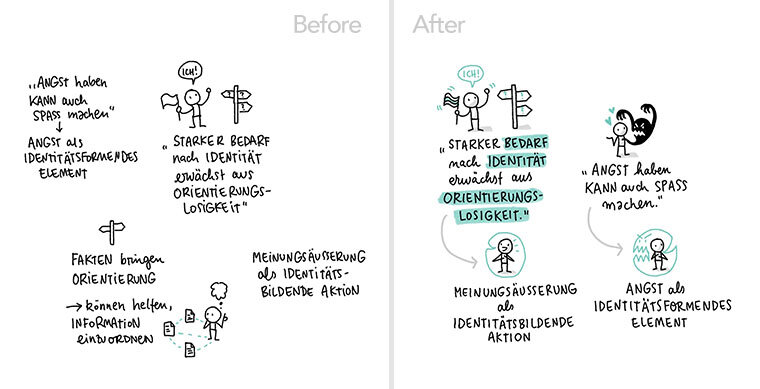
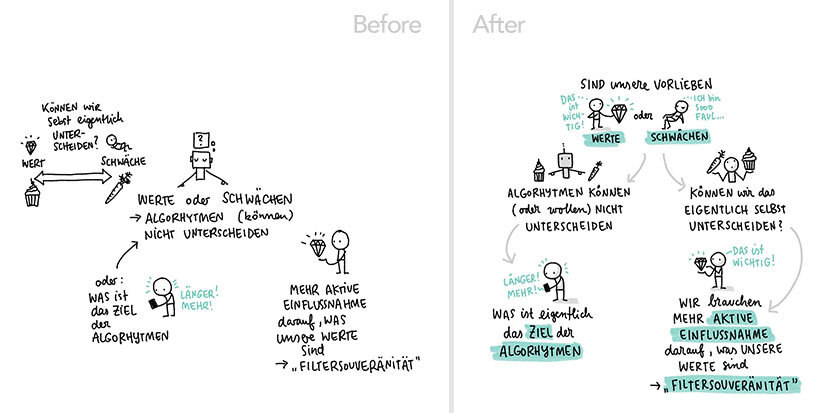
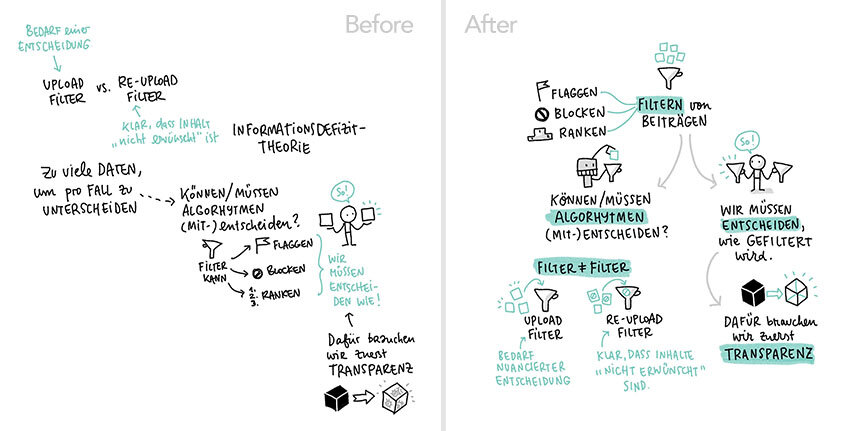
Above: A few sections of the recording before and after re-structuring / re-drawing
(click on the small thumbnails at the bottom to see all examples).
I wrote a whole article about the power of re-ordering live-captured content. You can read it here to learn about the why and the how in more detail.
Besides creating a big restructured version of the whole canvas, I also extracted individual content chunks and exported them as separate images. This is a nice format to create little slideshows that present series of points on one sub-topic in a more guided narrative format.
I posted a few of those on my instagram to highlight a few interesting chains of thoughts.
The time lapse videos you see throughout this article are nice by-product of working in Procreate by the way. The app automatically stores a stroke by stroke history of whatever you draw and you can replay and export it as a video with just a couple of taps.
I sometimes use these video replay videos to get a better understanding of my own working process. While I am deeply concentrating on sketchnoting an event live, I don’t pay much attention on HOW I actually work. When do I write, when do I draw, at which point do I set highlights, add colour, or re-group elements, etc.?
Above: Timelapse video of of the re-structuring and re-drawing process after the discussion
Every now and then it’s good to take a step back, revisit my own process to understand a bit better WHAT I actually do and HOW, so I can keep refining my craft. And these video are also just really fun to watch…They make everything look so easy :D
I hope you enjoyed this little peek into this project, my process and the reasoning behind working the way that I do. If you have any tips or experiences about capturing live events and working with the content afterwards, please share in the comments.
PS: The videos of the two introductory presentations by Alexander Ritzmann and Abraham Taherivand are available on YouTube (in German).